
Hello, good day! In this article, I would like to discuss what we can do to elevate the API performance in the Blog.io application I developed using Nest.js, Redis, PostgreSQL, and Prisma, or what we should avoid.
Scenario Description In the Blog.io application I developed with Nest.js, we will test the APIs provided by the backend using Artillery.io on our server with Docker, particularly in line with real-life scenarios. Additionally, we will also use Postman for these tests. We will start by explaining the basic concepts; then we will move on to the improvements made specifically for the application I developed.
Ways to Take API Performance to the Next Level
In this section, we will thoroughly explore various techniques that can be used to enhance API performance. These techniques are critical for boosting the speed and efficiency of our applications, and when implemented correctly, they can also improve the user experience.
A) Using Select: Returning unnecessary fields in database queries can negatively impact performance and lead to unnecessary data transfer. To prevent this, the use of select is crucial. By specifying only the required fields, select helps reduce the size of the response from the database, thereby improving the performance of your API. In the example below, you can see how to use select to retrieve only the necessary user information and the profile picture url
 const user = await this.prismaService.user.findUnique({
      where: { uuid: uuid },
      select: {
        uuid: true,
        email: true,
        role: true,
        name: true,
        ProfileImage: {
          select: {
            imageUrl: true,
          },
        },
      },
    });
In this way, by fetching only the necessary data from the database, performance can be improved, and the unnecessary data processing load can be reduced.
B) Caching: To minimize database queries and improve the performance of your application, storing frequently used data in an in-memory database, such as Redis, is an effective method. This technique is particularly ideal for data that doesn’t change frequently. Redis stands out in such cases due to its low latency and high performance.
Before moving on to the test scenarios, let’s look at an example of how we can perform caching with Redis. For instance, instead of querying the database every time for user profile information, we can store this data in Redis to enable faster access. By doing so, when the same data is needed repeatedly, we can read it from Redis instead of performing a database query, thereby achieving a performance boost.
async getUser(uuid: string): Promise<UserDto> {
  // Searching for the user in Redis
  const cachedUser = await this.redisService.get(`user:${uuid}`);

  if (cachedUser) {
    return JSON.parse(cachedUser);
  }

  // If the user does not exist, fetch it from the database.
  const user = await this.prismaService.user.findUnique({
    where: { uuid },
    select: {
      uuid: true,
      email: true,
      role: true,
      name: true,
      ProfileImage: {
        select: {
          imageUrl: true,
        },
      },
    },
  });

  // Save redis
  await this.redisService.set(`user:${uuid}`, JSON.stringify(user), 'EX', 3600); // 1 saat geçerli olacak şekilde

  return user;
}
C) Pagination: When working with large datasets, retrieving all the data in a single query can have negative consequences for both performance and user experience. In such cases, presenting data in paginated form, or using “pagination,” can enhance both database and API performance.
Pagination is particularly important when dealing with lists that contain a large amount of data. For example, instead of returning thousands of users in a single response, an API that returns user lists can paginate the results and deliver a specific number of users per page. This approach reduces the load on the database and prevents unnecessary data loading on the client side. Ultimately, this method allows you to offer users a faster and more responsive interface.
Pagination with Prisma is quite easy. By using the skip and take parameters, you can specify which data should be returned. Below is an example that demonstrates how you can paginate users:
const users = await this.prismaService.user.findMany({
  skip: offset,
  take: limit,
  select: {
    uuid: true,
    name: true,
    email: true,
  },
});
D) Lazy Loading: In relational databases, loading related data only when needed can significantly enhance API performance. This approach is particularly useful when working with large datasets, as it allows for more efficient use of system resources by loading only the necessary data.
Lazy loading is based on the principle of loading data only when it’s accessed, rather than fetching all data at once. This can make a critical difference in efficiency, especially when dealing with large and complex relationships in the database. For example, when querying a user’s profile information, it makes more sense to load only the necessary data rather than fetching all related data every time.
There are several ways to implement Lazy Loading in Nest.js projects. However, it’s important not to confuse this concept with the Lazy Loading used in Angular, which deals with loading modules. In Nest.js, Lazy Loading pertains to managing database relationships.
E) Use of Indexes: To ensure that your database queries run quickly, it is crucial to use indexes on the appropriate fields. In Prisma, you can create an index using the @@index or @unique annotations. For example, in a scenario where users are frequently queried based on their email field, it would be logical to add an index to the email field.
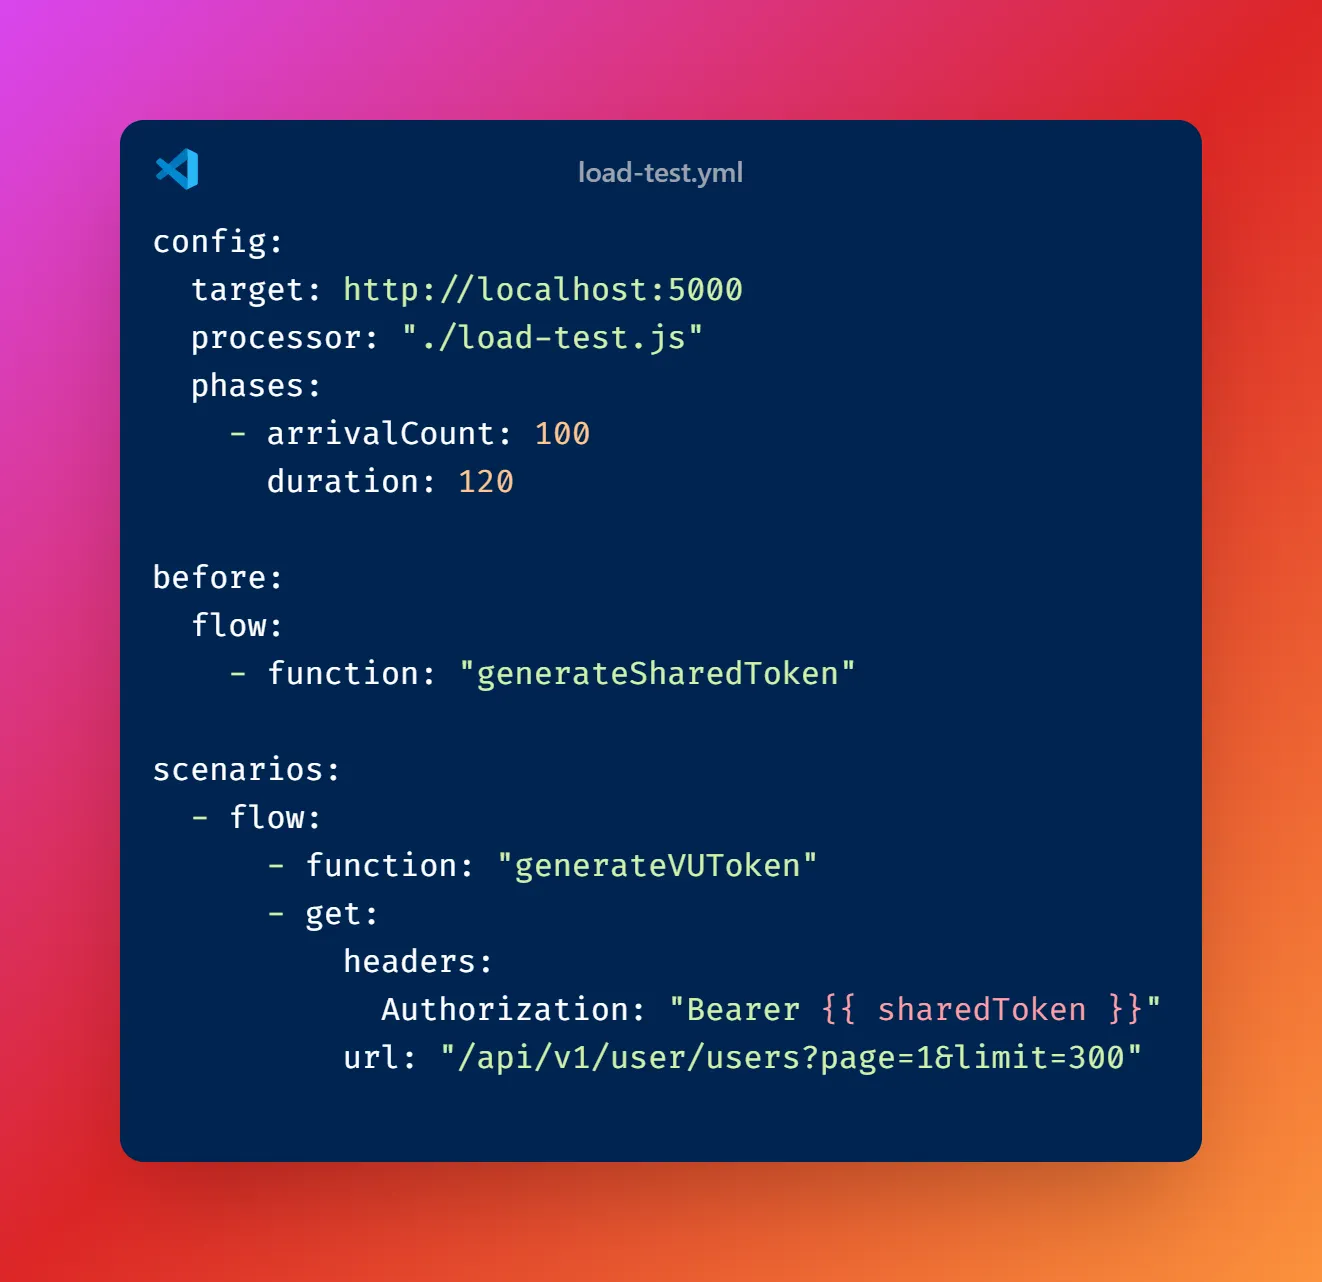
First, I will test the “GetAllUsers” method within the User Service that I previously wrote for the Blog.io application. Evaluating the performance of this method will be an important step in measuring the speed of access to user data. Additionally, in the later stages of the project, I plan to diversify our test scenarios and simulate different load conditions using the load-test.yml file that we created with Artillery.io.
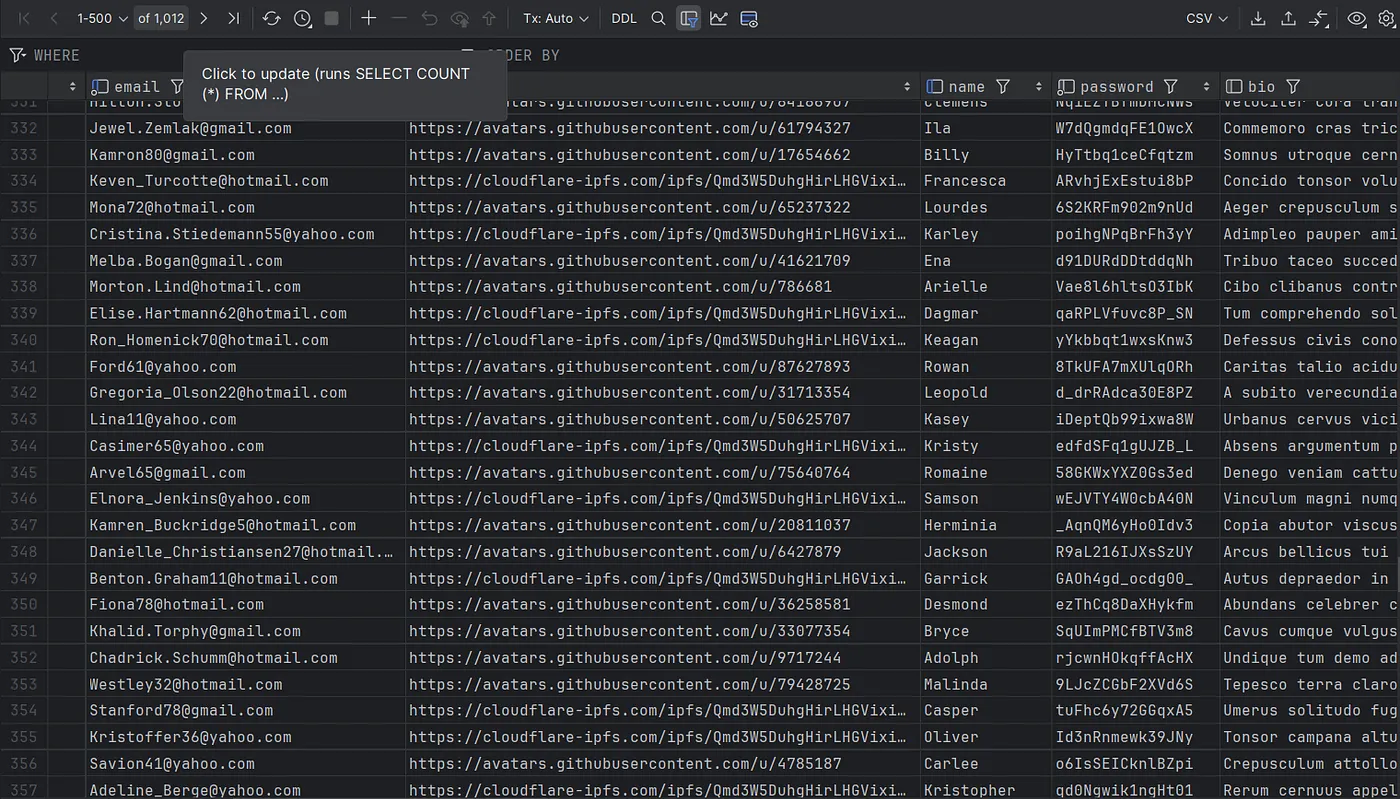
Additionally, we are creating 1,000 fake user accounts in our PostgreSQL database using Faker.js. These user accounts are stored in a user table that includes fields such as name, email, password, and bio. This allows us to test the application's performance on a realistic data set and more accurately measure the impact of our optimizations.
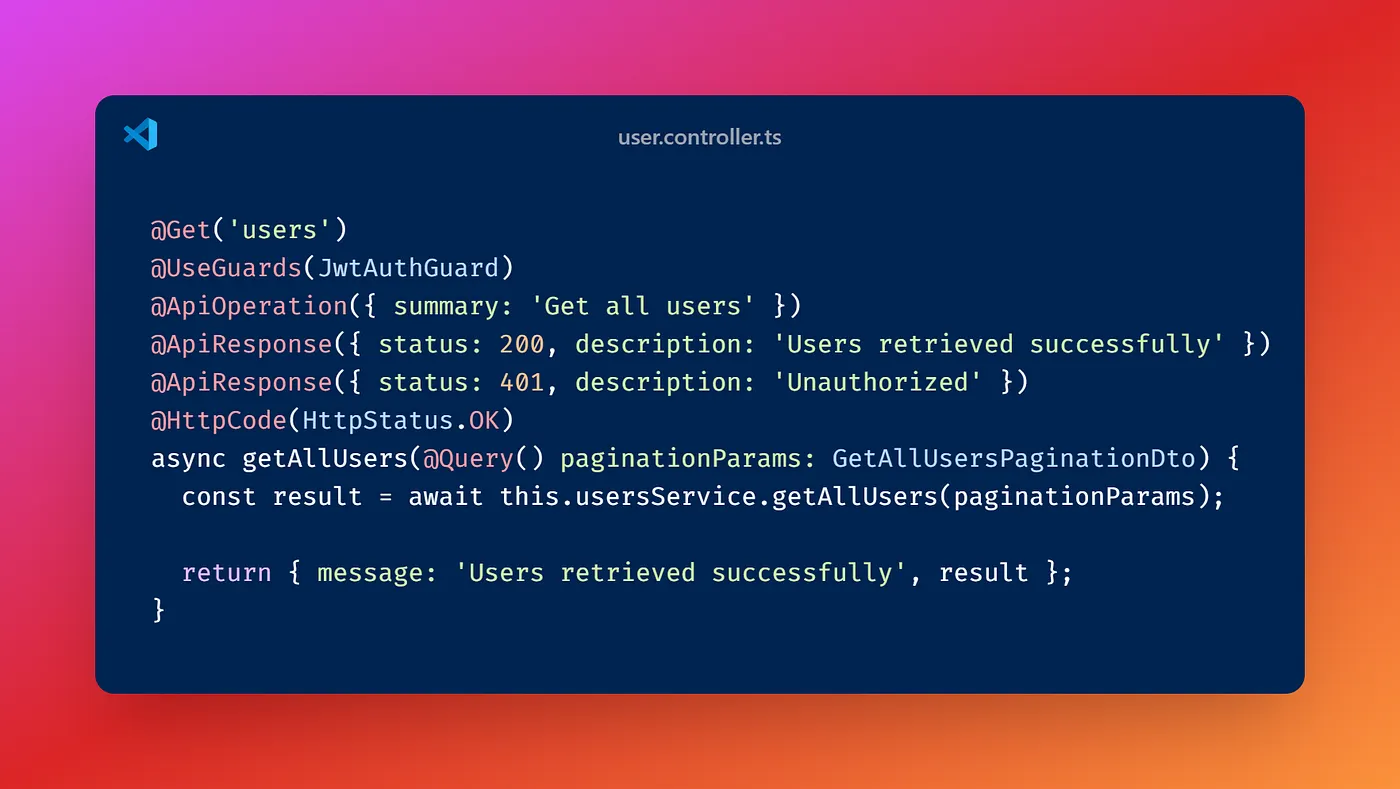
We use the following example to fetch users on a specific page by utilizing pagination and limit parameters with our API:
GET "/api/v1/user/users?page=1&limit=300"
We have configured this API to return 300 users starting from the first page. This example provides a solid foundation for evaluating how the application handles user data and assessing its performance.
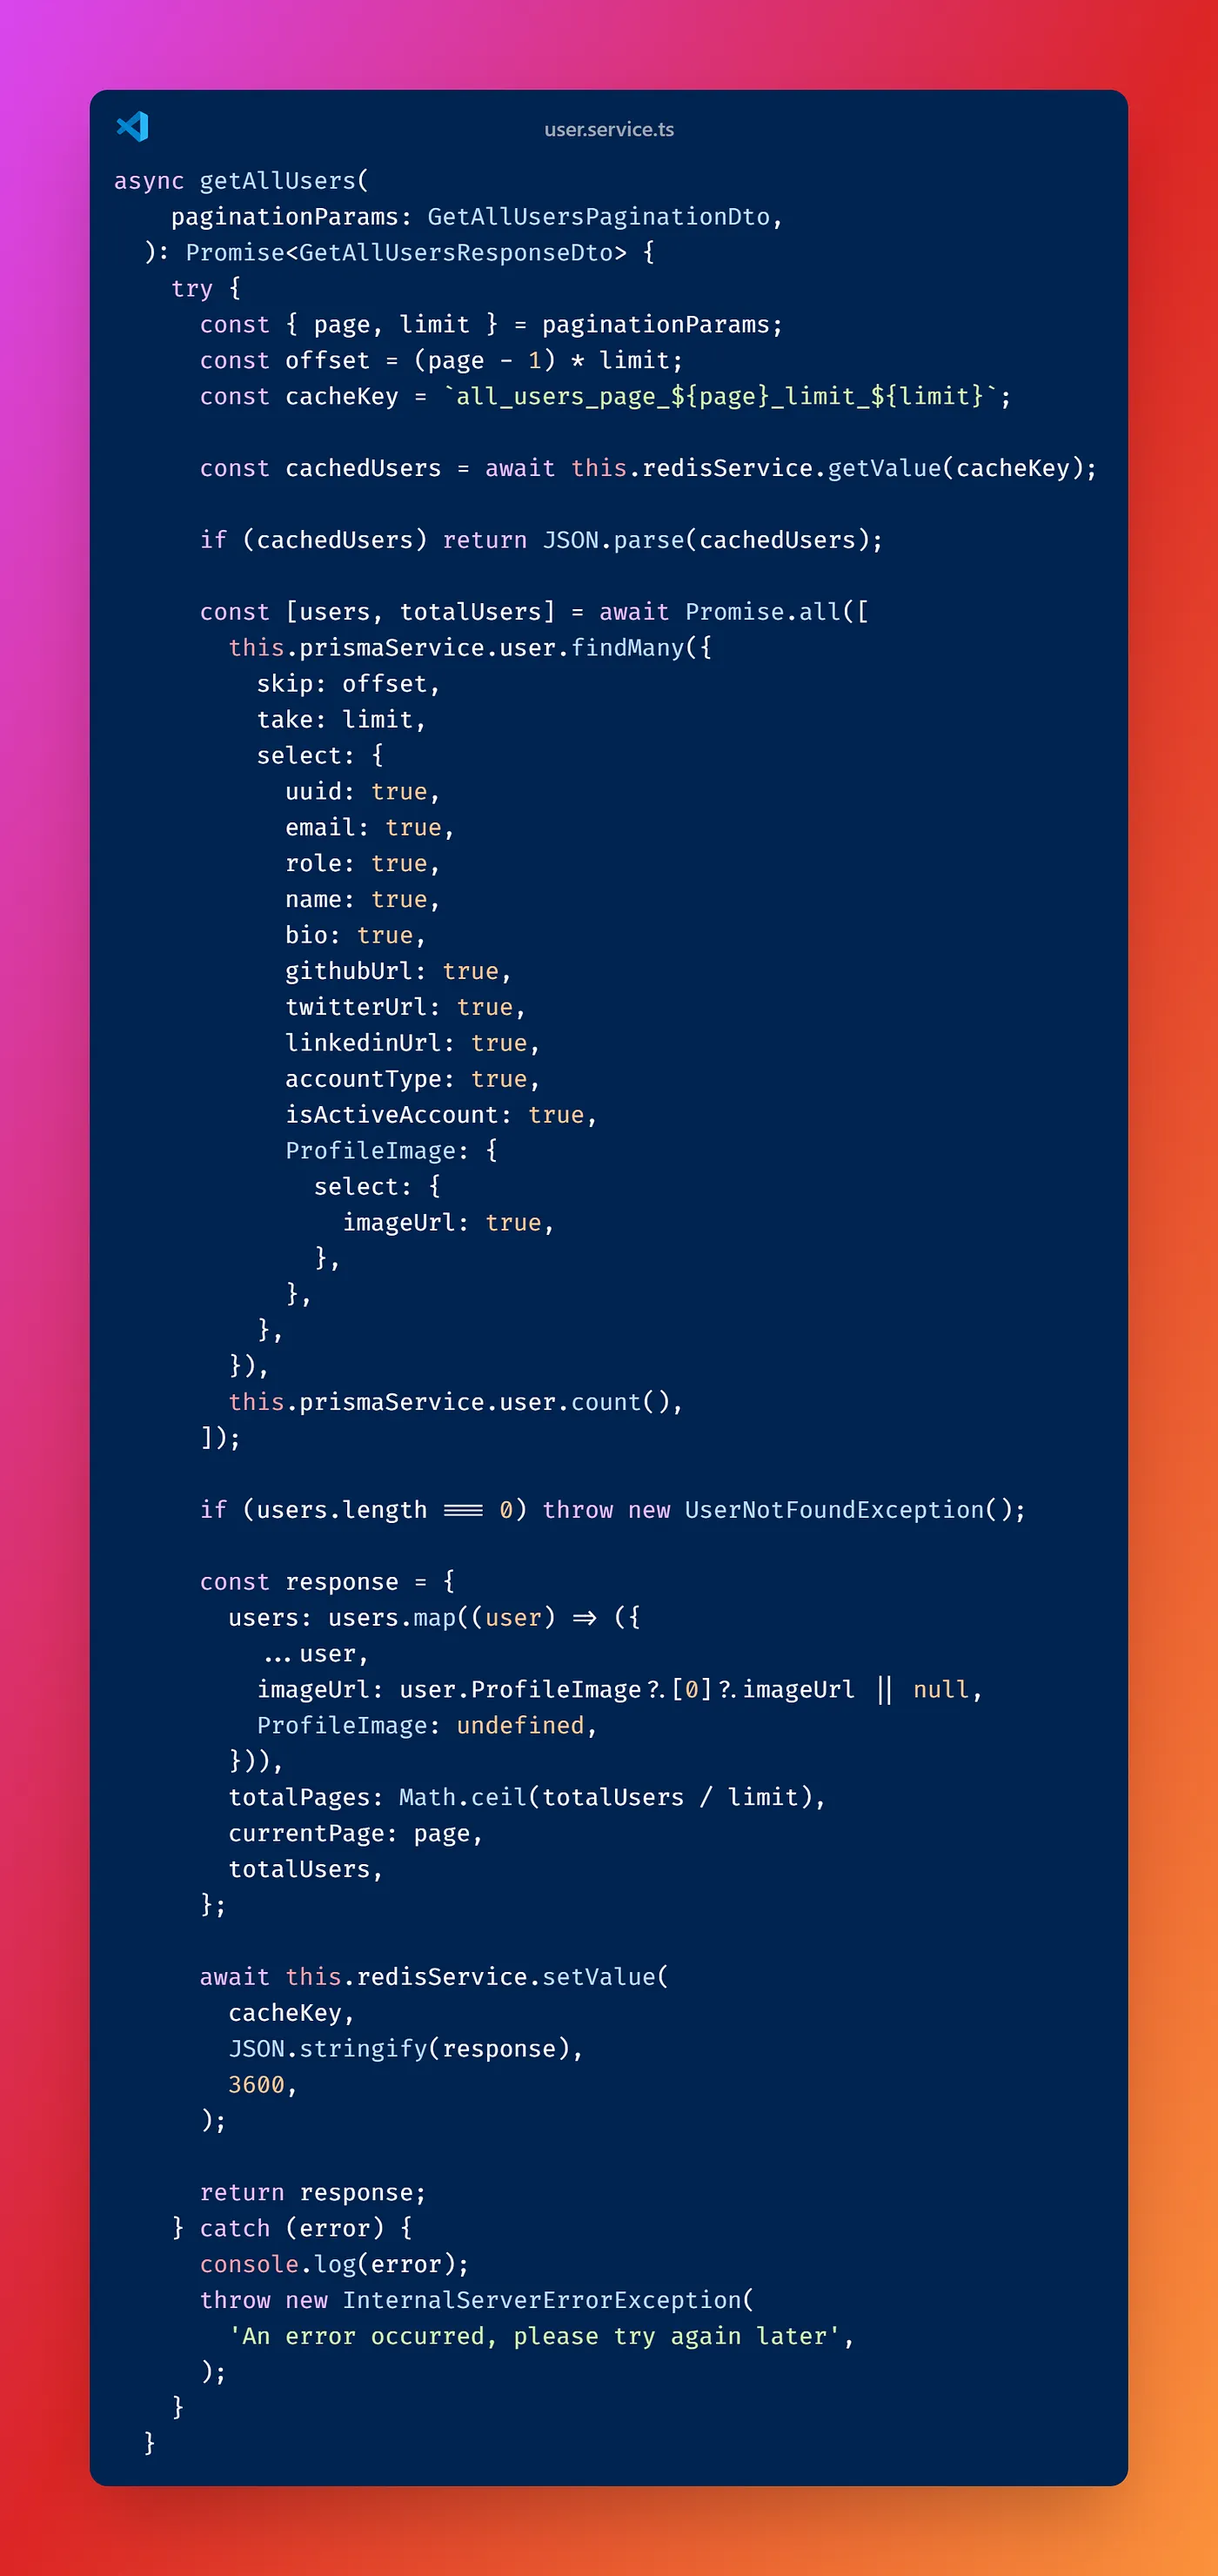
In this service, user information is first searched for in the Redis cache. If the user data is not found in Redis, a query is made to the database, and the retrieved result is saved to Redis for caching future queries. This approach ensures that frequently accessed user data is delivered quickly and minimizes the number of database queries, thereby enhancing API performance.
Before starting comprehensive tests with Artillery.io, let’s begin the process by conducting a test with Postman. In this initial test, since we don’t have any cached data in Redis yet, the API will directly interact with the database to query user information. This will be a crucial step in measuring the application’s performance before the Redis cache is activated.
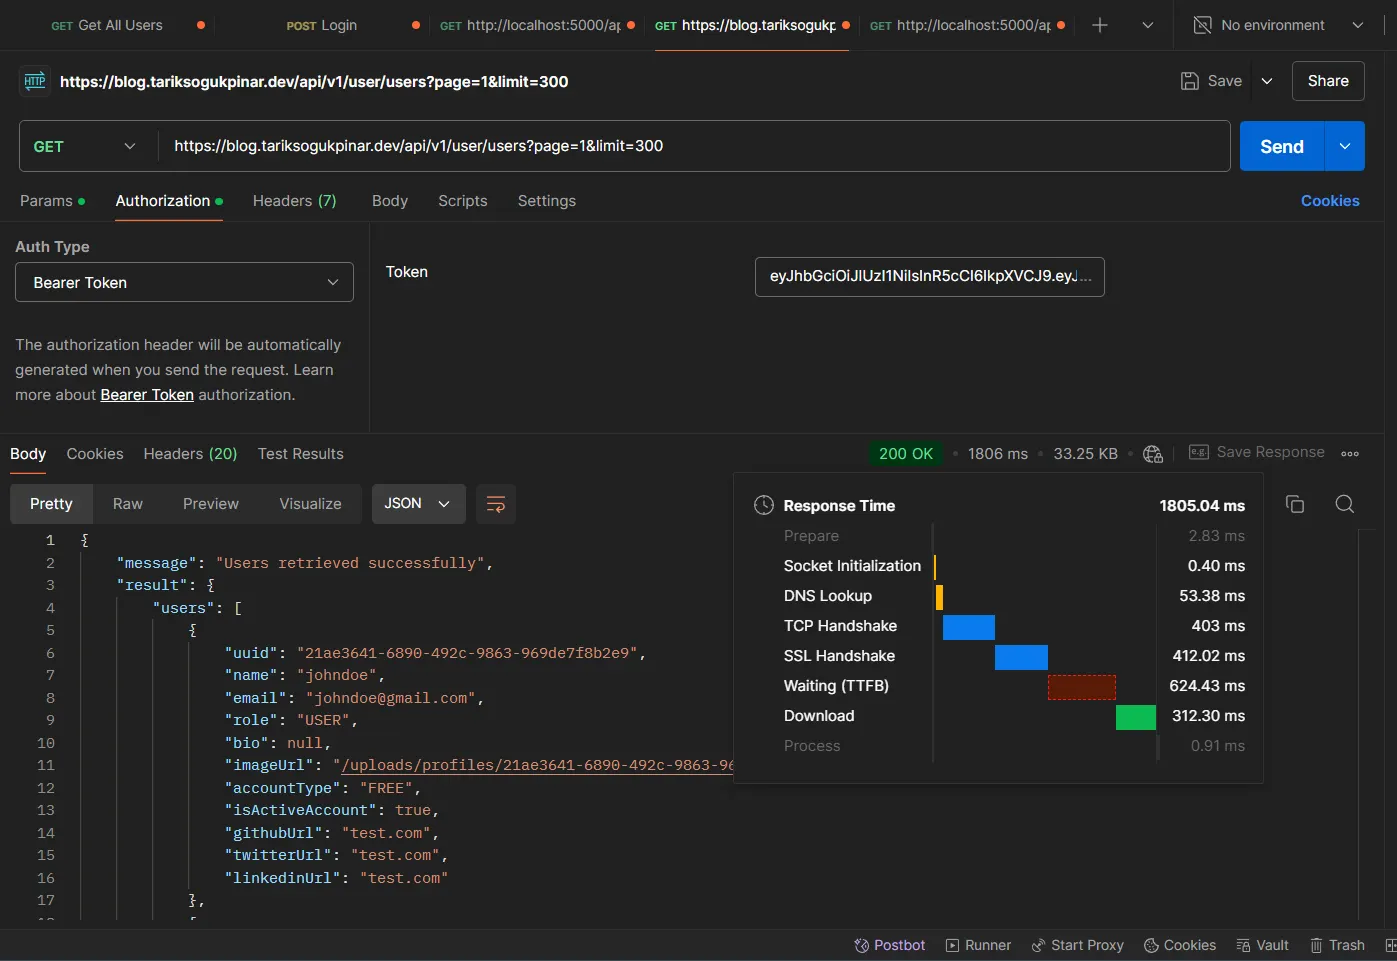
When we make a request to the API for the first time, it takes an average of 1805.04 ms. Currently, the user information is being retrieved entirely from the database. As mentioned earlier, this GET request first checks the Redis cache. If the cache is empty and does not hold any key value, it initially queries the database and then caches this data by setting it into Redis.
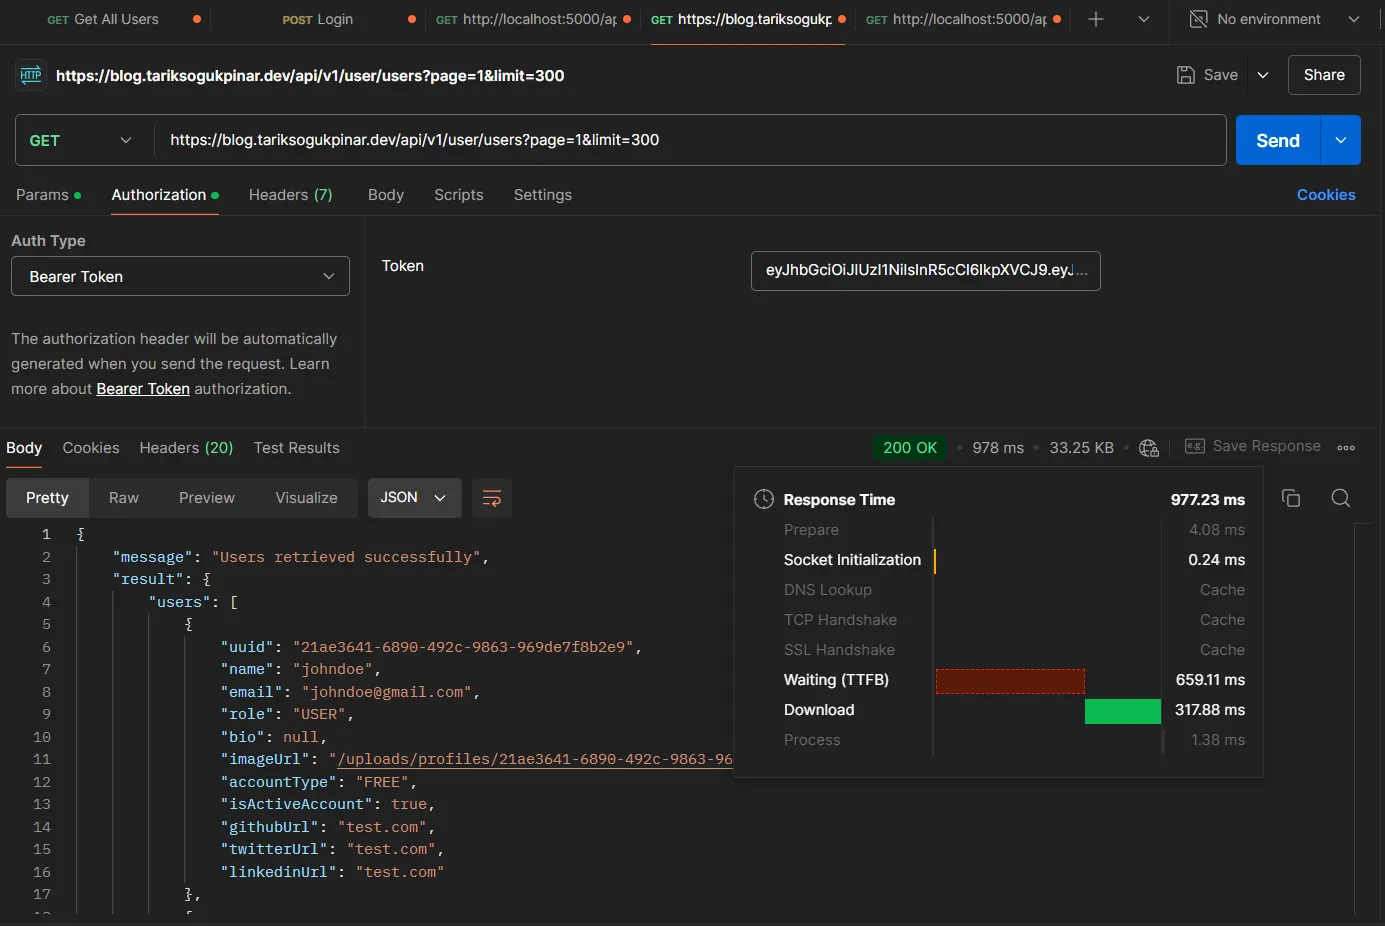
When we run the test again, we can see that the response time has decreased to around 977.23 ms. In this test, our environment is running on an Ubuntu server with Docker. Our server is located in Turkey, while the requests are being made from Thailand :)
The basic testing process we conducted with Postman ends here. Now, let’s perform HTTP tests in a more comprehensive and realistic manner on our Ubuntu server using Artillery.io. Artillery.io will allow us to measure our API’s performance under high load and conduct tests that are closer to real-world scenarios.
To begin, we can access our Docker container with the following command:
docker exec -it fb7d83731e73 /bin/bash
After entering the container, we can start our Artillery.io test by running the following command:
artillery run load-test.yml
```
Now, let’s add more APIs to our `load-test.yml` file and rerun the test. This step will allow us to evaluate the performance of different API endpoints simultaneously, providing a broader perspective on the overall performance of the application.

Our current `load-test.yml` file is structured as follows. Now, let's run the test with this configuration and stress-test our system. In this test, 50 requests per second are sent to each API for a duration of 50 seconds (as specified by our `duration` and `arrivalCount` values). The results we obtained at the end of the test are as follows:

As a result of the test, we observe a minimum response time of 6 ms, a maximum of 474 ms, and an average of 104 ms. When evaluating these results, it’s important to remember that only the “users” API has a caching mechanism in place.
Now, let’s take our scenario a step further by conducting a more intensive load test on our application. To do this, we’ll update our `load-test.yml` file. We'll use the following command to run the updated file:
artillery run load-test.yml - output test_result.json
This command will save all our test results into a `.json` file. Our new configuration will simulate 200 users per second, with these users sending requests to the APIs for 120 seconds.

Results and test explanations

> **1.** Test Duration**:** The test lasted a total of 2 minutes (60s).
>
> **2.** 2,800 successful (200 OK) responses were received.
>
> **3.** An average of 7 requests per second were made.
>
> **4.** A total of 800 requests were sent, and 800 responses were received.
>
> 5. Response Times:
> Minimum: 6 ms
> Maximum: 419 ms
> Average: 88.8 ms
>
> 6. Virtual User (VU) Statistics:
> 200 virtual users were created and completed.
>
> 7. Session Durations:
> Minimum: 250 ms
> Maximum: 549.5 ms
> Average: 367.6 ms
**Conclusion:** This test scenario helped us understand how our application performs under moderate load. During the test, 2,800 successful responses were received, and all requests were successfully completed. In terms of response times, the minimum was 6 ms, the maximum was 419 ms, and the average response time was 88.8 ms. This indicates that the application generally delivers fast and consistent performance. Thank you very much for reading this far. You can find all the links mentioned in the article in the description. See you in the next post!
Related Resources;
[https://github.com/TarikSogukpinar/blog.io](https://github.com/TarikSogukpinar/blog.io)
[https://github.com/TarikSogukpinar/blog.io/blob/master/api/load-test.yml](https://github.com/TarikSogukpinar/blog.io/blob/master/api/load-test.yml)
[https://github.com/TarikSogukpinar/blog.io/blob/master/api/seeder.ts](https://github.com/TarikSogukpinar/blog.io/blob/master/api/seeder.ts)
[https://github.com/TarikSogukpinar/blog.io/blob/master/api/load-test.js](https://github.com/TarikSogukpinar/blog.io/blob/master/api/load-test.js)
[https://github.com/TarikSogukpinar/blog.io/blob/master/api/Dockerfile](https://github.com/TarikSogukpinar/blog.io/blob/master/api/Dockerfile)
[https://hub.docker.com/repository/docker/ledun/blogio-api/general](https://hub.docker.com/repository/docker/ledun/blogio-api/general)